
Why chicks can’t set and hatch in the same incubator and need transfer.
At the point chicks hatch, they create a lot of fluff and waste that should be contained and managed. For this reason, it is commercially not viable to set and hatch in the same machine. Therefore, the use of two different machines, a setter and a hatcher, is necessary.
- The setter is designed to initiate the incubation of cold endothermic eggs during the first 18 days of the hatching process. Requiring a lot of heating at first, the embryos will grow and become exothermic. At this point, they will require a lot of cooling instead as they will produce a lot of heat themselves.
- The hatcher will also have a lot of heating, but this is mainly to dry out the machine after it has been cleaned. Hatchers and hatcher baskets always should be dry before they’re used. As soon as the eggs are in it from day 18 to 21, the hatcher will mainly cool down because the developing chicks produce the most amount of heat.
Removing the eggs from the setter
On day 18, eggs have to be transferred from the setters to the hatchers. In this stage, it is crucial to avoid risks of cooling or overheating by keeping the time outside the incubators to a minimum.
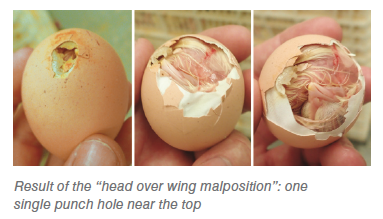 As soon as the circulation fan in the setter stops, eggs no longer receive cooling air. Hatchery operators should remove one trolley at a time to make sure they get as much airflow as possible to keep them cool. Although the eggs on the outside of the trolley will start cooling down, the eggs in the middle of trolley will still lack airflow to aid the cooling process. These will risk overheating, which often causes the “head over wing malposition”.
Manual transfer
With the head over the wing, the chick can punch through the egg, but it can’t achieve the correct angle to continue moving around. This usually results in one single punch hole near the top, not enough for the chick to hatch.
To avoid overheating, you also have to make sure that there are eggs wherever you have a temperature probe. Not paying attention to this will result in a cold spot at the probe, which in turn will result in the machine overheating.
You have to keep the transfer room at 26 °C with a minimal humidity and a low but stable airflow. The air pressure should be at 2.5 Pa, lower than the pressure in the Setter Room (3Pa) but higher than the Hatcher Rooms (2Pa), to ensure that the air flows correctly through the hatchery.
![]()
Candling
Transferral of the eggs on day 18 is the perfect opportunity to remove clear eggs (infertiles & early dead). You can do this manually with a torch, by use of a candling table with manual clear egg removal or by a system that detects and removes eggs automatically. Even with an automated system, we still recommend taking samples by hand – preferably 3 sample trays per flock per week, taken from the top, the middle and the bottle of a trolley. The detected clear eggs should then be broken out to see the level of infertility and the level of early dead. Don’t forget to mark the remainder of the tray for further breakouts at hatch.
Clear eggs will be used for pet food or will be thrown away together with rots or bangers. Exploding eggs belong in a bucket of disinfectant to avoid contamination of the environment.
Manual transfer
Eggs can be transferred by hand, putting the hatcher basket upside down over the egg tray and then turning them both together over again manually or by a specially constructed framework. However, this way of working has some disadvantages: next to the increase of cracks, manual transfer rarely involves removal of clear eggs. This results in many inverted eggs, causing that the egg fluid transfers to the air cell at the bottom, which leads to late mortality of the chicks. If the chicks however hatch, they will usually appear scruffy so they will be culled anyway.
Automation at transfer
![]() Automation can go from very basic as a transfer machine lifting the eggs from the tray and placing them into the basket, to fully automated unloading of the setter trolleys and automatic candling. This automatic candling detects the amount of light passing through the egg to determine the presence or absence of development in the egg. Advanced technologies can even detect actual life via heat or heart beat detection. This makes it possible to remove rotten bacterial loaded eggs (bangers) as well.
Automation can go from very basic as a transfer machine lifting the eggs from the tray and placing them into the basket, to fully automated unloading of the setter trolleys and automatic candling. This automatic candling detects the amount of light passing through the egg to determine the presence or absence of development in the egg. Advanced technologies can even detect actual life via heat or heart beat detection. This makes it possible to remove rotten bacterial loaded eggs (bangers) as well.
However, no equipment is infallible and each system must be well maintained and monitored. You should always check eggs sent through as fertile to ensure the correctness of the system. For example, a dirty light or camera will make the equipment see a shadow, which it may interpret as an embryo. This can cause that all clear eggs pass through the transfer. Any clear egg remaining can break open at take off and contaminate the chicks, particularly if you are using a chick separator.
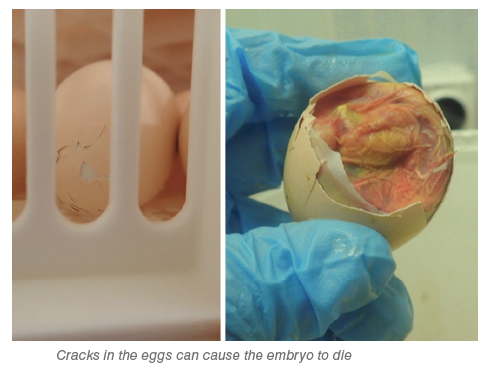 Although automatic systems cannot cause inverted eggs, we still recommend paying attention to ensure that they are correctly set up. Poor alignments, eggs dropping from the transfer head and abrupt stop of hatcher baskets can cause eggs to crack. Egg-shells are particularly brittle at this stage, as the embryo has drawn and utilized much of the calcium for its development. A crack at this stage will result in the embryo drying out and dying.
Always remember that dirty/floor eggs pass the same transfer heads as clean eggs. Because of this, transfer heads can possibly become the cause of cross contamination. Routine cleaning after each use and a full stripped down clean every 3 to 6 months depending on the quality of your incoming eggs is a good way to ensure good hygiene at this point.
We also recommend using transparent pipes on all suction equipment if possible. This allows seeing at a glance how clean the equipment truly is internally.
In-Ovo vaccination
Vaccination of the embryo can also be done in the transfer room; however it is necessary to allow the embryo to develop a little further to ensure the optimal delivery site of the vaccine. A successful In-Ovo vaccination requires the vaccine to be delivered either into embryo or in the amniotic fluid (which is taken up by the embryo). If the embryo is vaccinated into the allantois, which is not absorbed, the bird will have little or no protection. For this reason, we do the transfer for In-Ovo vaccination from 19 days to 19.5 days.
Key takeaways to reduce loss at transfer
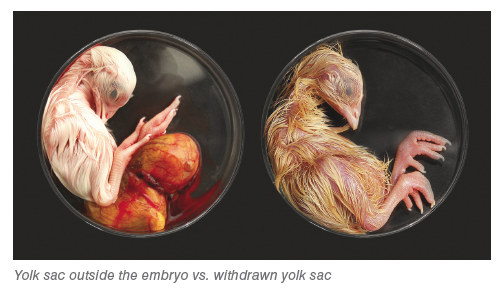 If you want to identify whether your transfer process is causing losses, break open some of the un-hatched eggs. Is the yolk sac still outside the embryo? The most likely cause of death will be transfer damage. If the yolk sac has been withdrawn, this suggests the embryo survived transfer, but died in the hatcher. In this case we recommend checking the conditions of the hatcher.
Of course, it is better to prevent eventual losses; therefore we sum up the main attention points for you to keep in mind during transfer:
- Take one trolley at a time to keep the time out-side the incubator to a minimum to avoid an increase in “head over wing” and late mortality with the yolk outside;
- Always have eggs/chicks at probe locations or overheating will occur;
- Use a transfer machine to avoid cracks and ensure eggs do not get inverted;
- Check automation equipment to ensure it is not causing cracks to the eggs;
- If you are using a chick separator, clear eggs must be removed to prevent fouling day old chicks during separation.
- Dispose of bangers or rots into a bucket of disinfectant to prevent further contamination;
- Keep equipment clean to prevent cross contamination.


