
Windrowing litter between flocks has been used commercially since the 1980’s and continues to evolve to meet numerous production challenges. The goal is to achieve one or more of the following objectives; conserve litter, complement waste management plans and/or reduce disease challenge and improve performance.
Conserve litter
With escalating bedding cost and in some cases limited availability, some fail to place at least 3 inch bedding depth following a total cleanout. High moisture bedding and marginal depth, particularly in cold weather flocks can lead to excessive litter wetness, caking and the potential for paw quality issues. It is not uncommon during crusting of the first flock following a total cleanout to remove up to one third of the litter base. The matted surface and “cake” often contains a significant amount of quality “bedding”. This is especially true when using shavings bedding and a crusting machine to de-cake a house. The reduced litter depth in the subsequent flock, particularly during cold weather can cause continued excessive caking and paw quality concerns.
In areas such as Delmarva, rather than de-caking there has been significant adoption of windrowing for the several flocks following total cleanout as a means of conserving the needed 3 inch-plus litter base. After windrow piles are leveled, the litter is pulverized and sometimes re-crusted with a de-caking machine, thus greatly reducing excessive bedding removal from the house. The decision to continue windrowing in subsequent flocks is often based on a desire to manage litter depth in the 4” to 6” range as well as achieving the other two objectives listed below.
Complement waste management plans
Windrowing litter has the potential of reducing the amount of cake that needs to be placed in on-farm storage structures after each flock.
An observation by the author from a house that windrowed/reconditioned one-flock old litter had 80% less cake in the subsequent flock compared to an identical house on the same farm that previously crusted-out using a skid- steer. The windrowed house during this winter flock had adequate litter depth for moisture control compared to limited litter depth in an adjacent crusted house. Secondly, when conditions warrant, some growers opt to incorporate the cake as a source of moisture for the windrowing process. When the litter is re-crusted with a de-caking machine after leveling the piles, the volume of cake is reduced by ~50% compared to pre-windrow cake removal.
Since the volume of litter often accumulates at a faster rate in windrowed houses due to limited cake removal, proper windrowing requires removing a portion of the litter base during the year. This is sometimes done in the Spring and/or Fall when there is an opportunity to use this resource off the farm rather than stockpiling in the manure storage structure. Others will remove a small portion of the litter each flock as means of controlling overall litter depth.
Windrowing may extend litter life thereby reducing the on-farm capacity needed to store large volumes of litter when total cleanouts are done on intervals of every two plus years. With increased scrutiny of having adequate on-farm storage capacity, optimum use of the poultry house for litter storage is a desirable option. Although windrowing may complement waste management plans by having less cake and total cleanout litter for storage, few growers windrow litter based solely on this objective.
Reduce disease challenge and improve performance1
In recent years windrowing litter between flocks has emerged as a proven technique to reduce many types of pathogens in litter and when combined with timely insecticide treatment, decreases darkling beetle populations to near zero. Even though this procedure has shown the greatest benefit on disease challenged and poor performing farms, it offers improved performance potential for a wide range of situations.
The following situations often benefit more from this pathogen reduction management technique: antibiotic-free and small bird programs, complexes or high density production regions facing disease challenges, poor housing or grower profile, locations having inadequate or expensive bedding materials, and those regions facing increased environmental scrutiny on waste management. In some of the more challenging situations it is advantageous to windrow the litter after each flock while others with less serious issues may consider it as a maintenance program done several times a year.
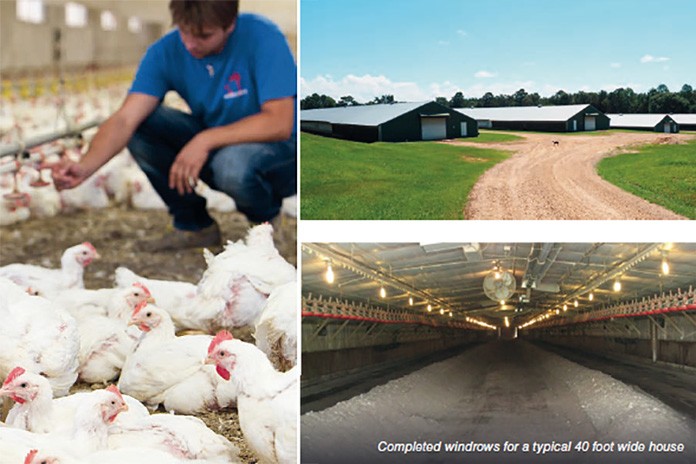
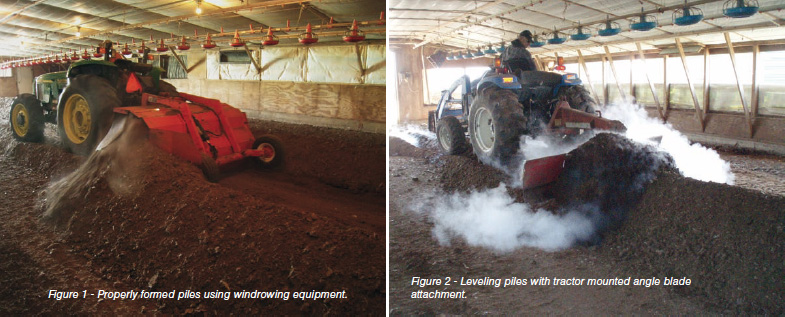
Windrows can be formed with grader blades on tractors; skid-steer loaders or specially- designed windrowing equipment. Each windrowing method has advantages and disadvantages. In the Mid-Atlantic area most have opted to use windrowing equipment since it pulverizes the litter, aids in breaking up cake and the hardpan; aerates, re-conditions the litter and forms desirable conical shaped windrows in the 18” to 24” height range (Figure 1). Windrowers also turn piles more effectively than blades or skid-steer loaders which facilities greater release of moisture and ammonia.
To assure maximum pathogen kill, the goal is to achieve litter temperatures of 130° F or greater throughout the litter mass for a minimum of three days. Litter just beneath the pile surface tends to heat up more rapidly than the lower portions of the pile. Since the outermost surface and lower portions of windrows may never reach target temperatures, turning piles exposes the cooler parts of the pile mass to these lethal temperatures. If time permits, letting piles heat for a total of 7 days (or more) is ideal. In most situations, temperatures will peak 3 to 4 days after pile formation and again within 2 days after turning a windrow.
Key procedures to achieve windrowing goals
To obtain the desired outcome with windrowing litter between flocks requires proper implementation of this procedure. The single greatest challenge to windrowing success is managing the ammonia. The benefits of this program are often diminished, and in some cases made worse, if appropriate steps are not taken to address this concern. The following is a list of key points in achieving desired windrow temperatures and pathogen inactivation while implementing strategies to reduce the ammonia challenge.
- The ideal time to start windrowing of litter is the first flock following a total cleanout. If starting with built-up litter, it is best to implement this procedure during warm or moderate weather to better manage the burst of ammonia release when disrupting the litter base the first flock. Higher ventilation rates may also be needed during brooding to control ammonia when first initiating this program. Afterwards, ammonia control in subsequent flocks tends to be more manageable if the other strategies listed below are properly implemented. Given litter conditions, housing and management; some often skip windrowing during the coldest winter flock(s) to avoid ammonia challenges. Yet other growers that have perfected windrowing techniques can manage ammonia throughout the year.
- Following bird movement, houses should be closed or minimally ventilated and windrows formed within the first 2 days. This maximizes the opportunity to kill spore formers (i.e. Clostridia) while still in a vegetative state. Secondly, it utilizes the active litter microflora to start the composting process before any significant die-off and minimizes the loss of litter moisture/relative humidity. Under marginal litter conditions some windrows will not achieve desired temperatures if pile formation is delayed. Finally, if the surface cake is allowed to dry out it becomes more difficult to break up.
- Litter depth should be managed within a range of 4 to 6 inches. If depth exceeds 8 inches, a portion of the litter should be removed. Windrowing excessively deep litter adds more cost to the process, decreases equipment operating efficiency and effectiveness; and increases ammonia control challenges. Some growers remove a portion of the litter each flock, others semi-annually or annually. It is often best to alternate cutting the centers and sides for depth control and to remove all hardpan during this process. The hardpan is one of the most concentrated sources of ammonia and moisture in “litter” and provides habitat for darkling beetles.
- Key factors in achieving windrow temperatures for optimal pathogen reduction are; litter moisture, porosity, C:N ratio and pile size. Litter moisture of 25% or more is often needed to achieve desired compost temperatures. With minimal caking, dry litter, good weather, and adequate layout time, the cake is sometimes incorporated for added moisture. As the amount of cake increases it may require pulverizing cake prior to windrowing and to re-condition or re-crust the house after leveling piles. Additionally, when caking exceeds 3 feet wide and/or 3 inches thick under the nipple lines, it is best to de-cake the house prior to windrowing.
In all situations, any flooded areas should be removed prior to pile formation. Although adding water to get litter moisture above 30% often insures the desired temperatures, it can create excessive ammonia levels if the windrowing process is not managed properly and is therefore not recommended for most growers.
As litter becomes dry and powdery following multi-flock re-use and fails to heat properly, supplementing with a fresh bedding material provides carbon, moisture and porosity that enhance the composting process. Not only does adding bedding prior to pile formation enhance the composting process, the microflora of the “compost” may support better bird performance than a topping of fresh bedding over windrowed litter. The optimum pile size using windrowing equipment is 18 to 24 inches high and conical shape. This size windrow heats rapidly, is easy to turn and allows maximum moisture and ammonia release. The number of windrows per house depends on litter depth and house width (Figure 2).
- Since piles do not heat uniformly, turning windrows exposes the cooler portions to higher temperatures. Turning also releases moisture and ammonia and aids in reducing cake particles. Piles should be turned at least once, and the more successful growers, when time permits, have often avoided ammonia challenges by turning piles two or three times. In most cases, temperatures peak by the third day after pile formation and again, within 2 days after turning. To insure piles are heating to achieve the desired pathogen reduction goal, temperatures should be monitored. An inexpensive digital thermometer with a 1-foot long probe inserted into the top of the pile is one option for monitoring temperatures. Because temperatures vary at different pile depths and piles vary in height, for consistency purposes, inserting the temperature probe at 50% of the pile depth is recommended.
- When the primary goal of windrowing is to reduce disease challenges it is important to remove all litter from the sidewalls and corners and incorporate it into the windrow as well as turn all litter under the pile base. A substantial amount of pathogen-laden litter will remain untreated if this litter is not subjected to windrow temperatures. Furthermore, it is best to blow off equipment prior to windrowing to insure pathogens in the dust are also subjected to this heat treatment. Farms experiencing some disease challenges such as dermatitis require two (or more) consecutive windrowing events (flocks) to break the disease cycle. On these farms the disease may re-appear once windrowing is stopped. Exposing the earthen floor to air on regular bases is considered beneficial to bird health. Additional benefits may be achieved by chemically treating these pads to reduce pathogen challenges in the soil. Since darkling beetles are vectors for many poultry pathogens, they too must be controlled to minimize disease carry-over into the next flock. Effective windrowing with timely insecticide application has proven highly effective in the near total elimination of this pest.
- Closing houses following windrowing to retain house temperatures, even in cold weather, will have little impact on pile temperatures. Unlike other between flock litter management programs in which houses are closed to conserve litter and house temperatures, windrowing increases litter temperatures, produces very high levels of ammonia, carbon dioxide and moisture, and requires more ventilation during layout. Opening the end doors on solid- sidewall houses does not provide adequate ventilation with this program. At minimum, the house should be closed with tunnel curtains cracked and one tunnel fan set on timer for 20%. More successful growers operate several tunnel fans continuously in warm or moderate weather and may drop back to daytime, timer or thermostat operation in cold weather. When available, the use of attic vents further enhances moisture and ammonia removal. Ventilation to remove ammonia and moisture should be provided from the day of pile formation until chick placement with a reduction in rates during pre-heating. When turning and levelling piles, maximum ventilation should be provided to aid in additional moisture and ammonia removal as well as provide a better work environment for equipment operators.
- The piles can be leveled with a 3-point mounted angle blade on tractor (Figure 3), skid-
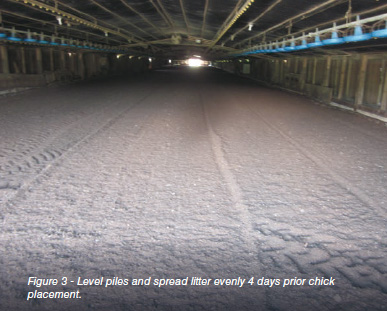 steer and/or windrowing equipment. Box blades and windrowing equipment with an adjustable skid to maintain consistent depth work well. Commercial operators often use skid-steers with crusting forks or land rake attachment to knock down and level piles. Whatever method is used it is important to get floors level and to spread piles at least 4 days prior to chick placement.
- After leveling piles one needs to assess litter conditions to determine if additional measures are needed to address moisture and cake. Squeezing a handful of litter provides a crude estimate of litter moisture. If it feels dry and crunchy it may be in the low 20% moisture range and ideal. That which feels moist but does not have particle adhesion upon compression might be in the mid-20% range and can usually be managed. However, if litter feels damp and particles adhere when squeezed, additional measures are needed to reduce the moisture content. Similarly, if the litter surface contains significant amounts of cake or hardpan, remediation is recommended. With excessive cake/hardpan, damp litter, cool weather, limited layout time and ammonia control a high priority, it is best to re-crust the house. With marginal cake and moist litter and time for additional drying, pulverizing the litter may be sufficient. Resources available to the grower and his ability to manage litter moisture, the weather and layout time are factors to consider in options needed for additional litter remediation.
- In cool weather and/or marginal management, additional measures may be required for ammonia control prior to chick placement. It may require an extended pre-heat of 48 up to 72 hours to purge ammonia. Furthermore, the rate of litter amendment for ammonia control may need to be increased by ~25% under these situations. These amendments should not be applied within 2 days after leveling piles.
- A 14-day layout is desirable to fully implement these windrowing procedures and an 18-day layout is ideal. Windrowing should be avoided if there is inadequate layout time or for cold weather flocks on farms that are unable to comply with the guidelines above for moisture and ammonia control.Reference
1. Malone, G. and T. Marsh Johnson, Portions of this material adopted from Chapter 10; Litter Management in the 21st Century, in A Practical Guide for Managing Risk in Poultry Production. AAAP, Inc. (2011) 177-179.
From the 2016 National Meeting on Poultry Health, Processing and Live Production


