
In commercial turkey production we aim to replicate and improve on what a mother turkey supplies to her young in the wild, this include heat, light, food, water, fresh air, security and comfort.
The importance of providing optimal brooding conditions is highlighted by its influence on post-hatch gut development, which if impaired during the first two weeks of life, can permanently limit the absorptive capacity of the gut.
The first few hours and days of a turkey poult are therefore the most significant period of its life and have a long-term influence on its capacity to fulfill its maximum health, welfare, growth and economic potential, evidence of which can be seen in the commercial world as increased egg and meat production. This stage of the bird’s life if well managed with attention to detail, will be time and effort well spent.
House preparation
Preparing a house for a new flock of turkeys starts as soon as the last one has depleted. Remove the old litter then wash down and disinfect using a well-managed professional cleaning team. All chemicals should be approved diluted and handled in accordance with the manufactures instructions. Washing of the house and equipment must be carried out thoroughly as any remaining organic matter has a major negative impact on disinfectant performance. After disinfecting and before new litter has been placed, the houses should have environmental swabs taken and visual inspections made to ensure good quality cleaning is maintained, in order to reduce the risk of pathogen challenges from one flock of birds to the next.
All foot dips/disinfectant mats and biosecurity measures should now be re-introduced to maintain a “clean” pathogen free environment within the houses. Water lines/header tanks should be drained and cleaned using an approved cleaning product such as a peracetic acid based product. At this point any maintenance or servicing to the house or equipment should be carried out.
Fresh high quality litter should now be laid on dry floors at a depth of a minimum of 7cm in Spring/Summer and 10cm in Autumn/Winter. This depth of bedding stops the poult from the chilling effect of the cool concrete floor beneath, so maintaining a warm thermal comfort for the poult. Hard wood or wet sawdust should not be used. It may be necessary to apply a secondary disinfectant via a thermal fogging application after the bedding has been spread and the house prepared for poult arrival this will depend on recent health status, age and condition of the houses.
House set-up
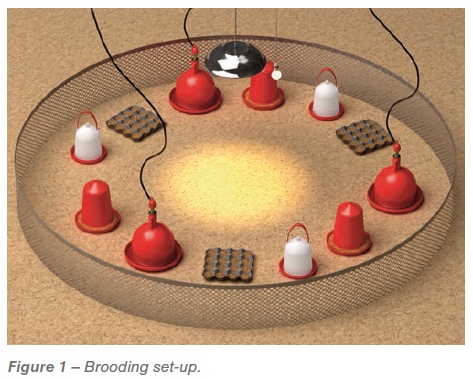
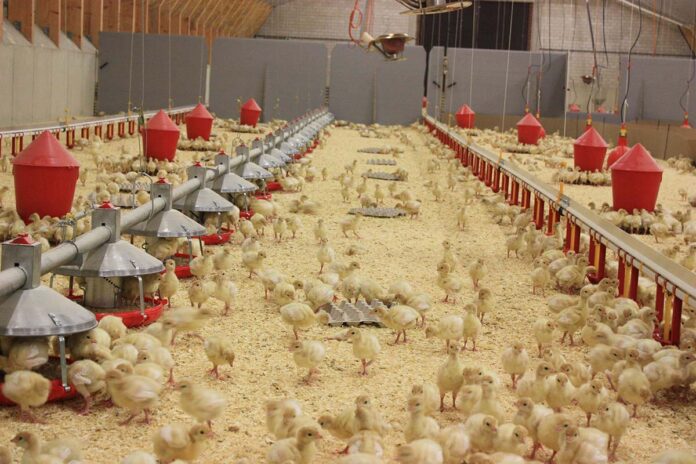
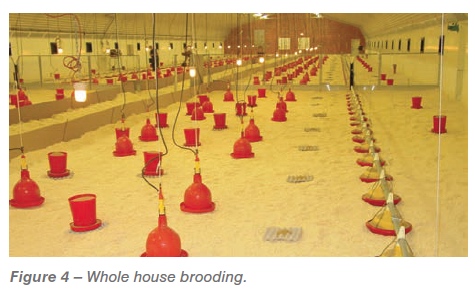
There are two ways to set up a house ready for day old poults 1; Spot brooding (Figure 1), where the poults are kept in rings for up to 5-7 days (commonly used for rearing breeding stock poults) or 2; Whole House brooding (Figure 4), where poults are allowed a much larger area to spread, with nearly all or all of the floor space utilised for brooding which is commonly used for commercial poult rearing. As for both systems the references laid out in this article are all equally important but the larger the brooding area the greater the pressure on the poults immediate environment (temperature, light, ventilation, feed and water). For this reason Aviagen Turkeys Ltd would advise smaller brooding flock sizes, if practical and economic.
1. Spot brooding:
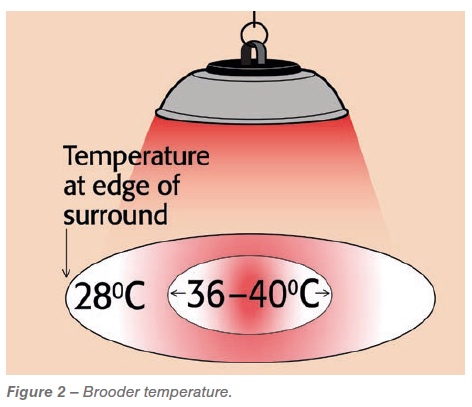
The ring size depends on the heat output of the brooder but in general the ring needs to be approx. 4m in diameter with a brooder that delivers a temperature range of 40 °C degrees in the middle and 28 °C at the edge (Figure 2). To achieve these temperatures the brooder can be raised or lowered accordingly. The surround can be of a solid material such as cardboard which is generally used in cooler countries or a mesh that is used in warmer climates. Height of the surround should be 45cm.
The fewer poults in a ring and the less competition between poults will increase the chance of a good start. As a general rule, each ring should contain no more than 270 male poults or 290 female poults.
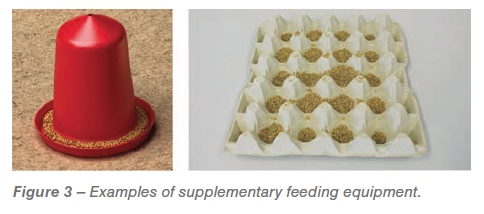
Within the ring there should be at least two feeding and drinking points per 100 poults, 50% of each can be of a supplementary type. Supplementary feeders can consist of a cardboard egg tray, plastic or cardboard tray.
- Whole house brooding:
Poults have access to a large area of floor space, therefore feed and water points need to be evenly placed across the floor area at the correct height. This usually means the permanent feeders and drinkers are positioned in lines the length of the house with supplementary feeders and drinkers in between, this ensures poults have minimum distance to travel to locate feed and water. As with spot brooding there should be a minimum of two feeders and drinkers to every 100 poults of which 50% can be supplementary.
Feed presentation
Feed intake in the brooding period is vital in terms of attainment of bodyweight targets. It is vital in either brooding systems that the starter feed is provided as either a sieved crumb or a mini pellet, both should be presentable to the poult with minimal levels of fine material (<10%). Aviagen Turkeys have a specialised feed sieve to help monitor the presentation of feed. Further information regarding the feed sieve can be found at www.aviagenturkeys.com.
Placing poults
Poults should be placed into a comfortable warm environment, pre-heat the house 24-72hrs prior to placement of poults. The surface of the bedding which the poult comes into contact with needs to be a minimum of 28 °C and ideally 30 °C before placement; this can be checked with an infrared thermometer. Attaining the correct brooding house temperature at placement is critical in the case of whole house brooding and extra preheating may be required to achieve this. Minimum ventilation and recirculation fans if available should be started 24hrs before placement to achieve an even temperature across the house. Prior to placing poults take a CO2 reading at floor level and in the case of spot brooding inside the brooding ring. This reading must be under 2500ppm if not increase the minimum ventilation until the required reading is achieved. Placing poults at CO2 levels above 2500ppm may result in reduced poult activity, feed intake and have a negative impact on health and bird performance. The house should be inspected well before poults arrive to make sure the environment; temperatures, water, feed and light (minimum 80 Lux) is adequate.
Transferring poults from the delivery vehicle into the house by trollies or personnel carrying the boxes can be a critical biosecurity risk. If trollies are used the delivery vehicle needs to be as close to the entry doors of the house as possible. Before entry into the house the wheels of the trolley need to be disinfected. During poult placement, separation of the dirty zone from the clean zone must be maintained at all times. Personnel transferring boxes from the vehicle to the house must remain in this ‘dirty zone’. Boxes should be transferred by personnel at the doorway who are dedicated to staying within the house and they must remain in this ‘clean zone’ for the entire duration of the placement. Personnel in the dirty zone must not enter the clean zone. When the poults arrive, do not delay placing them as this will increase the risk of dehydration. The delivery vehicle should be unloaded as quickly as possible to prevent the poults from becoming chilled and to reduce unnecessary heat loss from the house. If spot brooding, do not place the boxes inside the ring as this may lead to overheating of the poults, place boxes outside all the rings before placing and check numbers are correct. For whole house brooding, count the number of boxes on the trollies as they enter the house. If the poults have been sexed at the hatchery ensure the boxes have been checked before releasing them to guarantee the correct sex is placed in the correct area of the house.
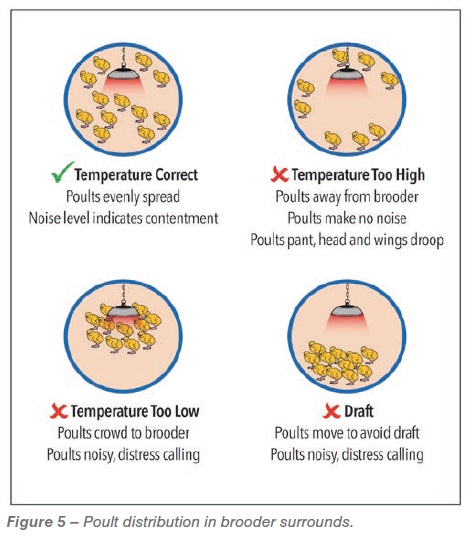
The poults can now be quickly, gently and quietly released from the boxes into the brooding area close to feed and water. Whilst placing the poults any dead on arrival should be noted. The poults should be alert, lively and looking for feed and water. After placing the poults, they should be left alone for 60 minutes to settle down, and to find feed and water without other distractions including unnecessary noise. After this time poults should be inspected every 2 hours checking the “spread” of the poults across the brooding ring or the floor on whole house brooding. Adjust the temperature on the basis of the poult spread and only use temperature charts as a guide (Figure 5 & Table 1).
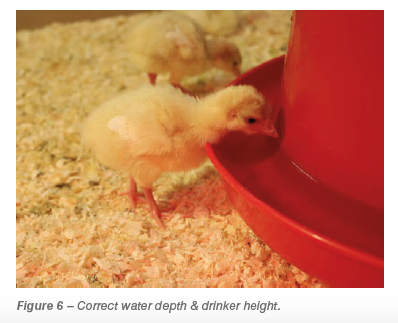
Feed and water must be replenished routinely and kept clean and free from faeces. A little and often approach when it comes to adding feed/water encourages poults to eat and drink if supplementary tray feeders become contaminated with faeces they should be replaced. With the high brooding temperature the water within the drinkers and the pipework becomes warm which isn’t appealing to the poults to drink, it also allows bacteria to multiply within the water system. Water systems and drinkers should be flushed to maintain a cool fresh water supply to the poults whilst ensuring the correct water depth & drinker height (Figure 6).
Litter can become wet or contaminated especially around drinkers; this requires removing and replenishing with fresh litter to prevent wet litter conditions (damage to the poults feet) which may lead to Foot Pad Dermatitis.
After 3-4 days two rings can be joined together to make one larger ring that allows poults more space and incorporates more permanent feeders and drinkers. Ring surrounds should be removed after 5-7 days to allow poults the area of the whole house.
For both Spot and Whole house brooding the supplementary feeders and drinkers should be removed gradually after 5-7 days i.e. remove half one day, leave for two days then take the rest out. This allows birds to transfer over to the automatic feeders and drinkers with the minimum of stress.
A lighting programme that includes periods of darkness should be introduced from day one with a minimum of one hour darkness. This dark period is built up gradually until 5 – 10 days when the poults should be receiving 8 hours of continuous darkness. Birds require this dark period in order to stimulate the production of melatonin that helps bone strength, providing poults with a rest period, increasing feeding and drinking activity.
People have experienced good poult start when the first 48 hours light periods have been alternated between light and dark every 2 hours. When the light comes back on after a dark period poults naturally are stimulated into searching for food and water. This is an ideal time to top up supplementary feeders.
When using either of the brooding systems (brooding ring/whole house) it is essential that the light intensity is a minimum of 80 Lux across the whole of the brooding area. This helps the poults locate the feed and water without delay after placing. After a few days the light intensity may need to be reduced if feather/vent pecking starts to occur. Aim to increase minimum ventilation every day to maintain good air quality. This can be tested by taking a CO2 reading daily (max. 2500ppm). This should be carried out at bird height, first thing in the morning to ensure you are measuring the air quality after a prolonged period of minimum ventilation and therefore at its highest CO2 level.
Conclusion
There are many important factors before and after poult placement which is crucial to the wellbeing of turkey poults, for this reason, management of this period is vitally important and relies on well organised staff and planning ahead. Taking short cuts and being poorly managed within the brooding period will compromise bird performance which will result in poorer financial returns both in terms of breeding and commercial bird performance.


