

Providing birds with the correct house environment is key to unlocking the full genetic potential and performance of a flock. Poultry growers often focus on limiting house energy and heating costs. In most cases, this is a false economy as it leads to a sub-optimal environment which is detrimental to final bird performance and therefore overall profit. Performance damage due to poor minimum ventilation in the early stages of the flock are realized towards the end of the cycle when it is too late to correct.
This article will cover the key considerations and basic calculations for minimum ventilation. The minimum ventilation system is designed to ensure good air quality and moisture control throughout the life of the flock, thus helping to achieve both optimum performance and bird welfare.
Minimum ventilation
Minimum ventilation is the minimum amount of ventilation (air exchange) required to maintain the full genetic potential of the birds by ensuring an adequate supply of oxygen while removing moisture, waste products, and combustion from the environment. Table 1 is a reference guide for air quality standards that must be maintained by the minimum ventilation system. 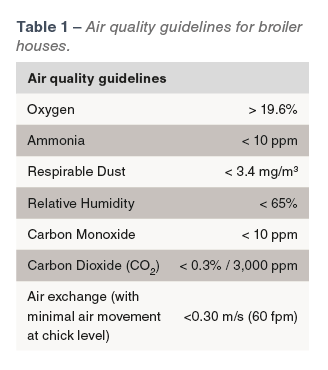
The system uses fans on a cycle timer and is independent of temperature control. Poultry houses need sufficient heating capacity (Table 2) to maintain house set-points on the cold days, while still allowing sufficient minimum ventilation, since the minimum ventilation system is the primary source of heat loss from the house. The minimum air exchange is linked to the amount of moisture added to the house by the birds, the drinking system, heating system and ventilation system. Under most conditions, maintaining good moisture control should supply adequate air quality for the birds and ensure carbon dioxide levels remain below 3000 ppm. 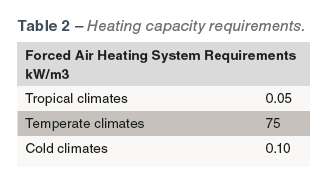
The preferred cycle time for minimum ventilation is a 5-minute (300 sec) on/off cycle with a minimum run time of approximately 20% of this time (five minutes = cycle of one minute on, four minutes off). Any time the air quality begins to deteriorate, small increases (10 to 15 seconds) to the ON time must be made, but the total cycle time should always remain the same i.e. if you increase the ON time by ten seconds you need to remove ten seconds from the OFF time so that the total cycle length remains at 300 seconds. The minimum time the fans are turned on needs to be approximately 60 seconds to ensure adequate mixing of the cold incoming air with the warm internal air and adequate extraction of moisture through the exhaust fan. However, if your house only has large (1.2 to 1.5 m/ 50 to 60”) tunnel type ventilation fans as opposed to the smaller (600 to 900 mm /24 to 36”) minimum ventilation fans then the cycle on time can be lowered to achieve similar air exchange rates.
The incoming cold air must be conditioned correctly by easily attaching to the ceiling, moving towards the peak of the house where it is heated, expand and its relative humidity reduced. The air jet must then start detaching from the ceiling near the centre of the house generating a return movement at floor level in the opposite direction. This return movement towards the side walls will ensure distribution of the warmer dry air thus bringing fresh air to the birds while also removing moisture and waste gases from the litter, the birds, and the heating system (Figure 1). 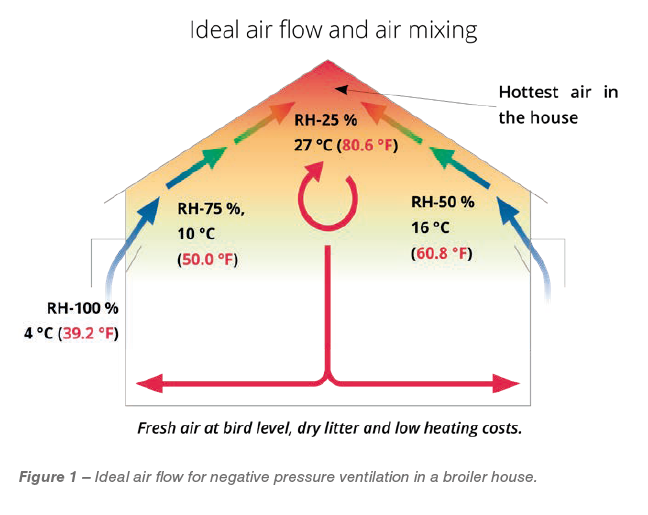
The stale moist air is then extracted from the house through the fans. The system runs when the house is at or below set point temperature and will operate on a timer program – see the example of a simple timer fan program below (Table 3). 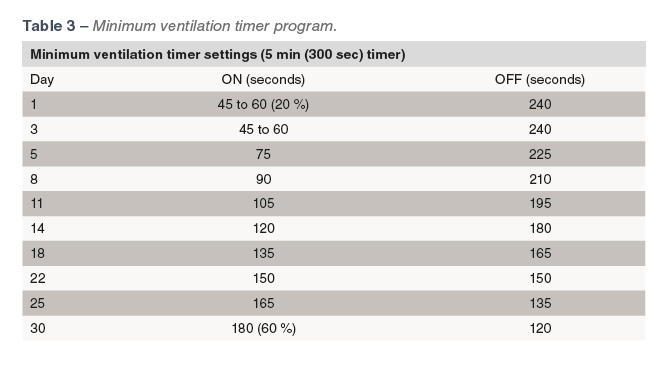
The timer fan capacity should be a minimum of 0.3 m3/min per m² (1.0 cfm per ft²) in hot climates where outside temperatures rarely drop below 20 to 25 ⁰C (68 to 77 ⁰F). In cold climates a timer fan capacity of 0.61 to 0.77 m3/min per m2 (2 to 2.5 cfm/ft2) of floor area, will be needed. The challenge will always be matching the requirement with fans available in the market. Do not use large tunnel fans for the minimum ventilation system, smaller capacity fans will always afford more stable environmental control and flexibility.
Some ventilation systems do not use cycle timer programs for minimum ventilation, but instead run a continuous ventilation system using variable speed fans. These systems are designed to produce a more uniform house environment, but it is strongly dependant on the fans pressure stability at low rpm. In practical terms can the incoming “air jet” attach to the ceiling to provide effective conditioning of the cold incoming air? These systems will require good quality environmental controllers, perimeter inlets and fans. They are not suitable for older (leakier) houses and will generally require a higher level of technical knowledge.
Example calculation
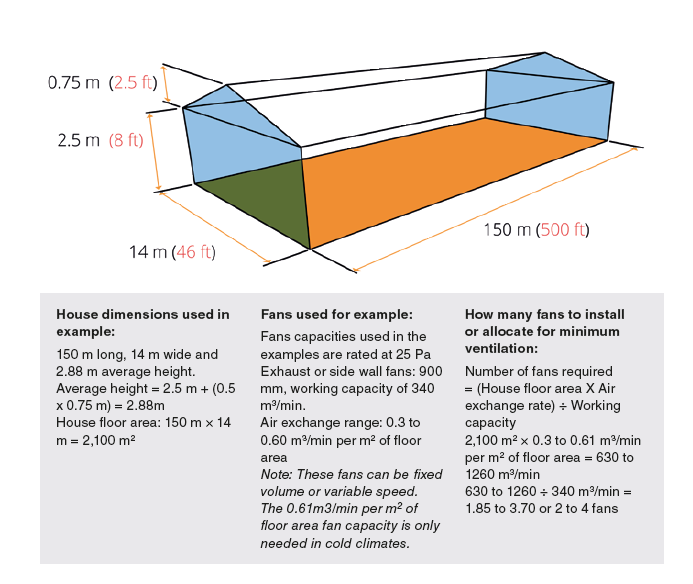
The sizing and run times should be adjusted to suit an individual house but the basic principles remain the same. The minimum ventilation cycle run times are only guidelines and daily adjustments should be made based on air quality and maintaining humidity below 65 % where possible. If the number of fans works out to be less than 1, then cycle on time can be adjusted to less than 60 seconds to maintain correct air exchange rates and not over ventilate the house. Some newer controllers use m3/bird/hr as an input setting for their minimum ventilation rates. In order to convert to these units, first calculate the total ventilation capacity at each age based on the number of fans used and the cycle timer program and then divide by the number of birds in the house.
E.g. Capacity of 2 fans = 40,800 m3/hr
Cycle time at day 0 = 60s ON; 240s OFF = 20% run time
Total capacity on cycle time = 20% of 40,800 m3/hr
= 8160 m3/hr
House has 40, 000 birds, so = 8160 m3/hr ÷ 40 000 birds
= 0.20 m3/bird/hr
Static pressure test
The number of fans to run for minimum ventilation has been calculated and a timer program for their run time has been designed. Next, it is important to achieve correct air conditioning. First, we need to ensure the house is as air tight as possible in order to effectively generate a negative pressure and ensure air enters through the inlets and not through leaks or gaps around the house. Conducting a static pressure test will let you know how tight or leaky your house is. Once a tightly sealed house has been established it is important to ensure correct inlet management.
Inlets
Important points about inlets:
- Minimum ventilation inlets should be sealed especially at the hinge, sides and along the leading edges, to prevent the cold air being directed down to the floor.
- When open, the air should only enter over the top of the inlet and not from the sides or through the bottom of the inlet
- All minimum ventilation inlets should direct air towards the peak of the house. The pressure drop across the inlets should be adjusted to ensure that the incoming air reaches the peak where the heat has accumulated.
- The pressure drop selected will depend on the width of the house or how far the air must travel once it enters the house.
- Correct air pressure is achieved by matching the inlet area and the fan capacity.
- Air inlets should be pressure controlled to maintain constant air speed throughout the ventilation stages.
- Table 4 can be used as a reference for the correct static pressure/inlet air speed required to ensure incoming air stays as close to the ceiling until it reaches almost half way across the house.
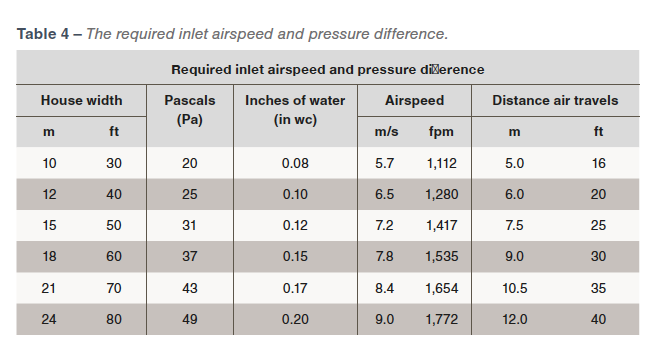
- The pressure drop selected will depend on the house width, how far the incoming air jet must travel once it enters the house, and the outside temperature.
- When outside temperatures are below 5 °C the inlet pressure drop, and opening size will need to be increased. The ability of the incoming air jet to attach to the ceiling depends on the temperature differentials between outside and inside the house.
- Always use a smoke test to ensure that the incoming air reaches the centre of the house. Smoke tests should only be done when the outside temperatures are significantly colder than inside, and when there is no wind.
- Inlets need to open enough to achieve the required static pressure and airflow. Depending on inlet design, a minimum opening of 2.5 to 5 cm is required to ensure cold air reaches the centre of the house.
- Inlets should be installed as close to the ceiling as possible – about 30 cm below the eaves provided there is no interruption of airflow.
- In open truss houses, the angle of the inlet opening must be such that the air is not directed onto a purlin which will redirect the air down to the floor.
- Any obstructions (electrical conduit/concrete or wooden beams) should be removed because they interrupt the air flow, forcing air to the floor.
- In the case of existing obstructions, a directional flap can be used on top of the inlet and/or a solid “air ramp” to aid the air in passing the obstruction.
- When using a negative pressure ventilation system, it is not the placement of the fans which dictate uniformity of air distribution but rather the placement of the inlets.
- To achieve uniform air distribution, inlets should be evenly spread throughout the house and open the same amount.
- Houses over 100 m (330 ft) should have the inlet drive units installed in the centre of the side wall to reduce any inlet opening variation. Solid 5 to 8 mm (0.2 to 0.3 in) steel rods eliminate any stretch and twisting.
- It is common for cables to stretch and twist and can cause variability in perimeter inlet openings. Inlets closer to the drive unit are open more than those at the end of the house. This can be minimized by ensuring a sufficiently sized counterweight or spring.
- Guide pulley position and size is very important for efficient closing and sealing of inlets.
- All inlets require wind proofing covers on the outside of the house. The inlet cover should be at least 30% more than the cross-sectional area of the inlet to minimize air restriction. These inlet covers also help to reduce natural light entering the house.
When it comes to minimum ventilation, there is rarely a one size fits all solution. However, by applying the information from this article together with good stockmanship, such as making daily adjustments to minimum ventilation based on air quality, humidity, and bird behaviour, will greatly assist with providing an optimum environment to achieving excellent bird performance.


